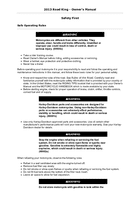
1. Left
2. Right
Headlamp Adjusters: Dual Headlamp
Models
Auxiliary/Fog Lamps
For models equipped with auxiliary/fog lamps, see a Harley Davidson dealer or service manual for
bulb replacement or alignment.
Turn Signal Bulb Replacement: Bullet Style
1. See Lens Cap Notch. Insert a coin or the blade of a small screwdriver into the notch at the
bottom of the lens cap. Carefully twist until the lens cap pops out of the lamp housing.
2. Push bulb in and rotate counterclockwise. Pull bulb from socket.
3. Inspect condition of electrical contacts in socket. If necessary, clean with a small wire brush
and electrical contact cleaner.
4. Apply ELECTRICAL CONTACT LUBRICANT to contacts in socket and at bottom of new
bulb.
5. Align pins on new bulb with pin guides in bulb socket. Push bulb in and turn clockwise to
lock in place.
6. Snap lens cap onto the lamp housing with notch at bottom.
Be sure that all lights and switches operate properly
before operating motorcycle. Low visibility of rider can
result in death or serious injury. (00316a)
7. Test lamp operation.